
TL;DR
Moving your AI rig into a closet is the easiest way to cut noise and improve sound quality—if you prioritize ventilation and sealing. Acoustic treatment alone won’t block sound, but smart placement and airflow make a huge difference.
Ever wished your workspace was quieter without sacrificing power? The secret isn’t just about tossing foam panels everywhere. It’s about where you put the machine—and how you treat that space. Moving your rig into a closet can cut noise dramatically. But only if you understand the real science behind sound and heat.
This guide walks you through why placement matters more than materials, how to turn a closet into a quiet, cool haven, and what pitfalls to avoid. Because the best setup isn’t just about absorbing sound — it’s about blocking, isolating, and managing heat with smart tweaks.
Acoustic dampening
& the rig in the closet.
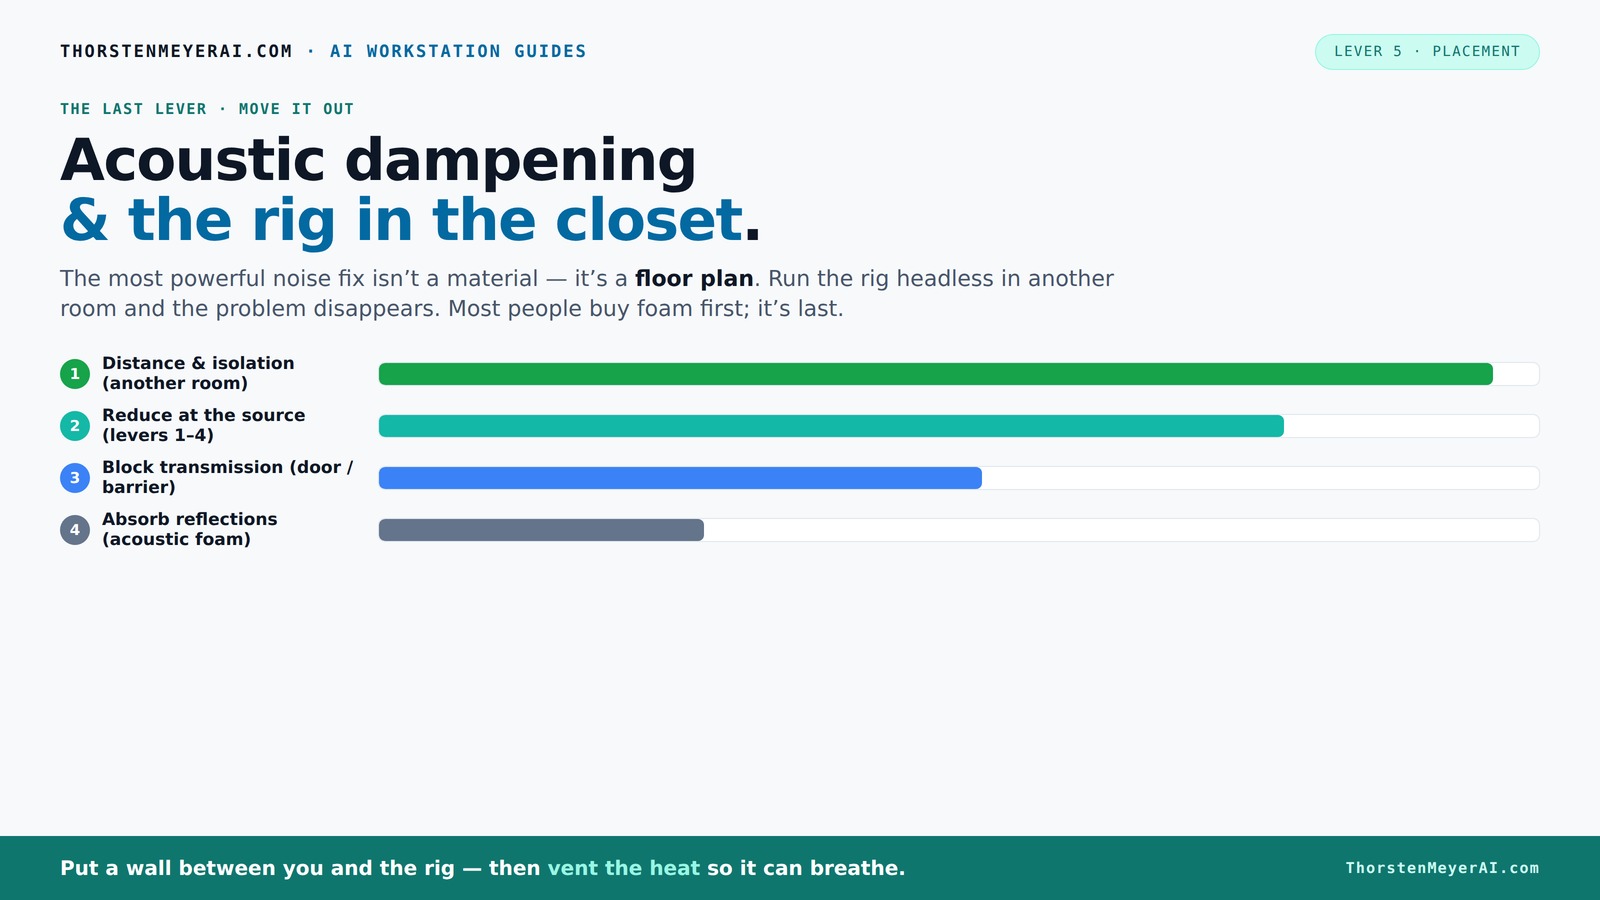
The most powerful noise fix isn’t a material — it’s a floor plan. A rig you can’t hear because it’s in another room beats any amount of foam. Tap the approaches in Part 1 to see what actually works.
(another room)
(levers 1–4)
(door / barrier)
(acoustic foam)
Contain the noise, not the heat
Key Takeaways
- Moving your rig into a different room, like a closet, is the most effective noise reduction technique.
- Always ventilate and provide airflow in a closet rig—heat buildup kills performance and noise reduction.
- Acoustic foam softens reflections but doesn’t block sound; sealing gaps and adding mass are necessary for soundproofing.
- Place treatment at reflection points—behind the mic, on ceiling and walls—to maximize sound quality.
- Choose the right mic (like a dynamic) and close-mic technique for small, treated spaces to prevent echo and ambient noise.
Focusound Acoustic Panels 24 Pack 2"x12"x12" with 120 PCS Double-Side Adhesive - Sound Proof Pyramid Foam for Walls, Home Studio Noise Absorption & Echo Control Kit
STRESS-FREE INSTALL: NO HOLES, NO RESIDUE! - Install & Remove Stress-Free with 120 reusable adhesive squares – cleans...
As an affiliate, we earn on qualifying purchases.
As an affiliate, we earn on qualifying purchases.
Why Moving Your Rig to a Closet Is the Easiest Noise Hack
The biggest noise reduction comes from distance. If your AI workstation lives in a separate room, the noise simply doesn’t bother you. Think of it like a loud neighbor—if you can move their music into their garage, your home stays peaceful. An AI rig in another room, accessed over the network, keeps the noise out of your space.
Imagine typing away on your laptop while a GPU hums loudly in a closet on the other side of the house. The noise never reaches your ears. All you need is a solid network connection and good airflow. That’s the simplest, most effective fix — no fancy foam needed. It’s the route most pros take for a reason: it works.
Ekkogo Acoustic Wall Panels 18-Pack, 12"x12"x0.4" Decorative Self-Adhesive Sound Proofing | High Density 3D Brick Soundproof Absorbing Tiles for Walls, Home, Office & Studio - Dusky Gray
[HIGH PERFORMANCE ACOUSTIC PANELS SOUND ABSORBING]: Made from high-density 5.9oz/ft^2 (1800gr/m^2) material, these acoustic wall panels provide excellent...
As an affiliate, we earn on qualifying purchases.
As an affiliate, we earn on qualifying purchases.
The "Rig in the Closet" Setup: How to Do It Without Cooking Your Hardware
Placing a hot, high-load machine in a sealed closet sounds perfect—quiet and out of sight. But it’s a trap. Without airflow, heat builds up fast. A 600W GPU can turn a closet into a sauna in minutes. The solution? Active ventilation. Think of it like a mini HVAC system for your rig.
Install a quiet exhaust fan, create passive vents, or both. Use ducting to direct hot air outside. For serious setups, consider a purpose-built soundproof cabinet with temperature controls. These combine acoustic foam, sealed panels, and cooling fans, keeping noise down and temps safe.
Don’t forget—your closet needs to breathe. Otherwise, your rig throttles, fans roar, and you get the worst of both worlds. Proper ventilation isn’t just about comfort; it’s about preventing thermal throttling which can significantly reduce your hardware’s lifespan and performance. Balancing soundproofing with cooling capacity involves tradeoffs: too tight, and heat accumulates; too open, and noise leaks out. Finding that middle ground ensures your setup is both quiet and safe.

Easy Cloud Computer Fan with AC Plug, 120mm Variable Speed Axial Muffin PC Fan with Controller 120V 110V 220V Small 12V Case Cooling for PC Server Cabinet DVR TV Router Receiver Xbox Greenhouse
【Speed Controllable】Easy Cloud axial fan 120v allows you to freely adjust the computer cooling fan speed according to...
As an affiliate, we earn on qualifying purchases.
As an affiliate, we earn on qualifying purchases.
Acoustic Dampening: What It Can and Can’t Do in Small Spaces
Acoustic foam and blankets can soften echoes inside a closet, but they won’t block sound from escaping. Soundproofing requires sealing gaps and adding mass, not just absorbing material. Think of foam as softening the echo—like wrapping a room in a plush blanket—not stopping noise from leaking out.
In a small closet, treatment should focus on reflection points — behind the mic, on walls, and ceiling. Bass traps in the corners help tame boomy low end. But don’t rely solely on foam. Seal every crack, gap, and outlet. That’s what keeps noise from sneaking out—and your neighbors happy.
Understanding the difference matters because many assume foam alone makes a space soundproof. While foam reduces internal reverberation and improves clarity, it doesn’t prevent sound from leaking through walls or gaps. For true soundproofing, consider adding mass (like drywall or mass-loaded vinyl) and sealing all openings. This layered approach ensures that your efforts in dampening reflections translate into a meaningful reduction in noise leakage, which is crucial in shared or sensitive environments.
Everlasting Comfort 2 Sided Door Draft Stopper for Bottom of Door - Keeps Cold Air in & Heat Out, 100% Sound Proofing Strip Gap Filler, Quick Install Noise Blocker Sweep for Home - Fits 30"- 36" W
QUICK AND EASY INSTALL: Ideal for doors 30" to 36" wide. Install in a few easy steps -...
As an affiliate, we earn on qualifying purchases.
As an affiliate, we earn on qualifying purchases.
Placement Principles: Where to Put Your Sound Treatment for Best Results
Sound treatment isn’t about covering every inch — it’s about placement. Start with the reflection points: behind the mic, directly opposite the speaker. Use a mirror if needed—any spot where sound bounces back to the mic needs soft material.
In a tiny closet, treat the side walls and ceiling first. Hard surfaces like shelves or doors reflect sound, causing harshness and echo. Bass traps go in the corners where low frequencies build up, preventing that muddy, boomy sound.
For example, if your vocal recordings sound hollow or muddy, adding foam panels behind the mic and in the ceiling can make a huge difference. Pair that with sealing gaps around the door, and you’re golden.
Proper placement of acoustic treatment is crucial because it directly impacts the clarity and quality of your recordings or audio monitoring. Misplaced panels won’t absorb the right reflections, and untreated reflection points will cause echo and harshness. By understanding the physics of sound waves and reflection points, you can strategically place your acoustic panels to maximize absorption where it’s needed most, leading to cleaner, more professional sound.
How to Seal a Closet Door and Edges for Better Soundproofing
Gaps around doors and outlets are the main leaks—sound escapes through tiny cracks. Sealing these is cheap and easy. Use weatherstripping, door sweeps, or acoustic draft stoppers. For outlets, plug plates with foam gaskets or put foam behind faceplates.
In a small closet, even small gaps matter. They let sound leak out and noise in. Think of it like sealing a jar — the tighter the seal, the quieter the room.
Pro tip: Close the door and listen for whistling or sound leaks. Seal those spots, and you'll notice a big drop in noise transmission.
Remember, the effectiveness of sealing depends on thoroughness. Small gaps around hinges, electrical outlets, and door edges can significantly compromise your soundproofing effort. Use a combination of weatherstripping, foam gaskets, and even expanding foam where necessary. Performing a sound leak test—like speaking near the sealed door—helps identify remaining weak points. Proper sealing enhances both sound isolation and overall acoustic integrity, making your treatments more effective and your space quieter.
The Right Microphone and Setup for a Closet Studio
In small, treated spaces, microphones matter. Dynamic mics are more forgiving because they pick up less reflected sound. They’re perfect for closet booths. Condensers, which are more sensitive, pick up every echo—so you’ll need more treatment.
Position the mic close to the mouth, about 3-6 inches away. Use a pop filter to reduce plosives. This minimizes room sound and produces clearer recordings.
For example, a Shure SM58 or SM7B works well in a closet. They cut down on room noise and are sturdy enough to handle close-up work.
Choosing the right microphone and setup is crucial because it directly affects the quality of your recordings. A microphone that rejects ambient noise and room reflections reduces the need for extensive treatment. Proper positioning—close to the source—minimizes the pickup of unwanted sound, ensuring cleaner audio. Investing in a good mic and understanding how to position it relative to your sound source can save you time and effort in acoustic treatment, leading to professional results even in small, challenging spaces.
Common Mistakes to Avoid in Tiny Vocal Booths
Many beginners think more foam equals better soundproofing. Reality: over-treating can cause a dead, boxy sound. Avoid covering every surface — focus on reflection points and corners.
Another mistake: sealing gaps without ventilation. Your rig will overheat. Always include airflow solutions.
Finally, neglecting mic placement—placing the mic too far from the mouth or away from reflection points—can ruin your recordings. Close mic technique is king here.
Understanding these pitfalls is essential because they directly impact your sound quality and equipment safety. Excessive foam can absorb internal reflections but may make recordings sound unnatural or muffled. Sealing gaps without providing ventilation risks overheating and hardware failure. Proper mic placement ensures you capture clear, focused sound without unwanted room noise. Avoiding these common errors helps you achieve professional-quality recordings and a functional, safe workspace.
What a Closet Can and Can’t Do for Your Sound and Noise Levels
A closet can dramatically improve sound inside the space and reduce noise leakage with proper sealing. It’s excellent for focused vocal recordings and quieting a noisy rig. But it won’t turn a loud machine into a whispering ghost—ventilation and sealing are key.
Real-world example: a tiny closet with foam, a door seal, and a small exhaust fan can cut ambient noise by over 30 dB. But if the fan is loud or the space isn’t sealed, noise leaks will persist.
In essence, a closet is a tool—powerful if used correctly, limited if you ignore heat and leak issues. Its effectiveness depends on careful implementation of sealing, ventilation, and treatment, balancing noise reduction with heat dissipation. Recognizing its limitations prevents disappointment and guides you toward a more successful setup that meets your needs without false expectations.
Frequently Asked Questions
Is acoustic treatment the same as soundproofing?
No. Acoustic treatment reduces echoes and reflections inside a space, making it sound better. Soundproofing blocks sound from escaping or entering the room. They work differently but complement each other for a quiet, professional setup.
Where should I place foam or panels in a closet booth?
Start with reflection points—behind the mic and on the ceiling. Treat side walls if they're close or parallel. Bass traps in the corners help control low-end muddiness. Cover gaps and leaks for best sound isolation.
Do I need bass traps in a small closet?
If recordings sound boomy or muddy, yes. Bass traps in the upper corners absorb low-frequency buildup, giving you clearer, more balanced sound. For tight spaces, they’re often a game-changer.
How much coverage is enough for acoustic treatment?
About 20–30% of the walls with absorptive material reduces echo significantly. For more noise control—especially in a room with loud rigs—aim for near-full coverage. Focus on reflection points first.
Will foam make my closet soundproof?
No. Foam absorbs internal reflections but doesn’t block sound from escaping. For soundproofing, sealing gaps and adding dense barriers are necessary. Foam alone isn’t enough to isolate noise.
Conclusion
Putting your rig in a closet is a game-changer—quiet, cool, and out of sight. But it’s not just about stuffing foam everywhere. Smart placement, sealing gaps, and managing airflow are what make it work.
Imagine a tiny room where your voice sounds crystal clear, and your noisy machine hums away in the background. That’s the power of thoughtful setup—turning a small space into a professional-sounding studio without breaking the bank.
Remember: the best rig isn’t just about hardware. It’s about where and how you treat that space. So, get those vents right and seal those gaps. Your workspace — and your sanity — will thank you.